signNow API Text Tags: How to place Complex Text Tags using the signNow API

signNow API Text Tags are specific combinations of symbols and letters in a document that represent fillable fields. In our previous blog, we covered how to place Simple Text Tags using the signNow API. Like Simple Text Tags, Complex Text Tags are added to a document first. The field properties are then specified in the body of the request.
If you’re new to the signNow API, make sure to check out our ultimate guide to the signNow API to get a better understanding of how it works. You can also learn more about real-life signNow API use cases provided by our customers across different industries – digital lending, medical insurance, remote online notarization, athletics, and more.
Complex Text Tags
Just like with Simple Text Tags, you can place Complex Text Tags on any PDF, DOC, or DOCX document to specify the placement of your fillable fields. This time your document should only contain field names, while field values are to be specified in the body of the request.
In other words, when you add a Complex Text Tag to a document, you only put the tag name in double curly brackets, like so: {{tag_name}}.Then, make a request to POST/document/fieldextract. In your request body, specify the parameters of the field that you specified the place for with your {{tag_name}}.
Use the following parameters for a Complex Text Tag:
- “tag_name” – duplicates the name without curly brackets, e.g., tag_name
- “role” – which role the field is assigned to, e.g., Signer_1
- “label” (optional) – hint for the signer inside a fillable field about the field type, e.g. first_name or text_1; once the field is filled in, the value automatically appears in all the fields with the same label
- “required” – whether the field is mandatory to fill in, e.g., true/false
- “type” – could be “text”, “signature”, “initials”, “checkbox”, “attachment”, or “enumeration” (stands for a dropdown menu)
- “prefilled_text” (optional) – editable text that appears in the field when a signer opens the document, e.g., Lucy
- “validator_id” (optional) – data validation format for a field.
Check for available formats in the Data Validators, field, or text tag parameters that specify the data format for the input.
- “width” – how many pixels wide a field is
- “height” – how many pixels high a field is
Note: The signNow documentation includes syntax examples of the Complex Text Tag for your reference.
How to place Complex Text Tags
Now let’s take a look at how Complex Text Tags are used in a document. Start by creating a sample employee leave request, adding fields to it, and assigning these fields to two signers (see How to place Simple Text Tags using the signNow API for instructions).
Here’s what our sample workflow looks like: we need to assign a tag name for each of the tags and put it in curly brackets. However, for our example there is no need to specify each of the tags as their logic is identical to one another. The call is composed as follows:
1. Сreate a POST request to upload the document and convert the tags to fillable fields.
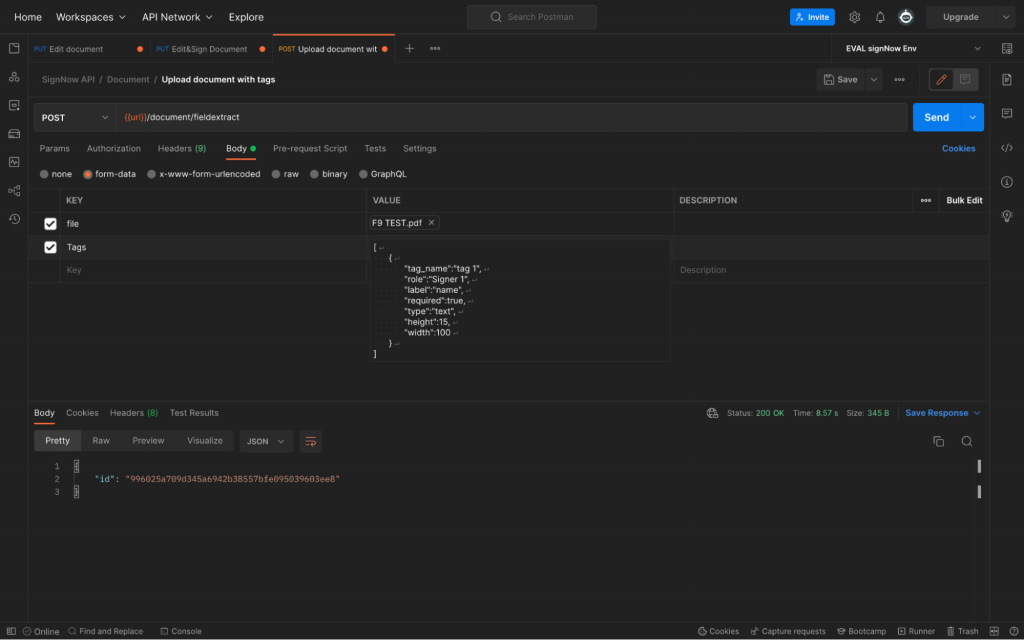
2. Start by setting up the headers using your bearer token. Then, switch to the body of the request. Here you’ll check the form data button, attach your document, and set the tag values in the value tab.

3. After all of the required call parameters are added, we can specify Tags value based on a kind of field we may need. The example below shows a required Text field for a Signer 1 that has a “name” label. Such tags can be created for any type of field discussed previously.
4. Once you add all of the tag invitations in the value section, you can send out a request and check the results in the UI. The example cURL for Sandbox account would be the following:
|
1 2 3 4 5 6 7 8 9 10 11 12 13 14 |
curl --location --request POST 'https://api-eval.signnow.com/document/fieldextract' \ --header 'Authorization: Bearer {{token}} \ --form 'file=@""' \ --form 'Tags="[ { \"tag_name\":\"tag 1\", \"role\":\"Signer 1\", \"label\":\"name\", \"required\":true, \"type\":\"text\", \"height\":15, \"width\":100 } ]"' |

That’s it. Send the request using the fieldextract endpoint and check the appearance of your signNow document.

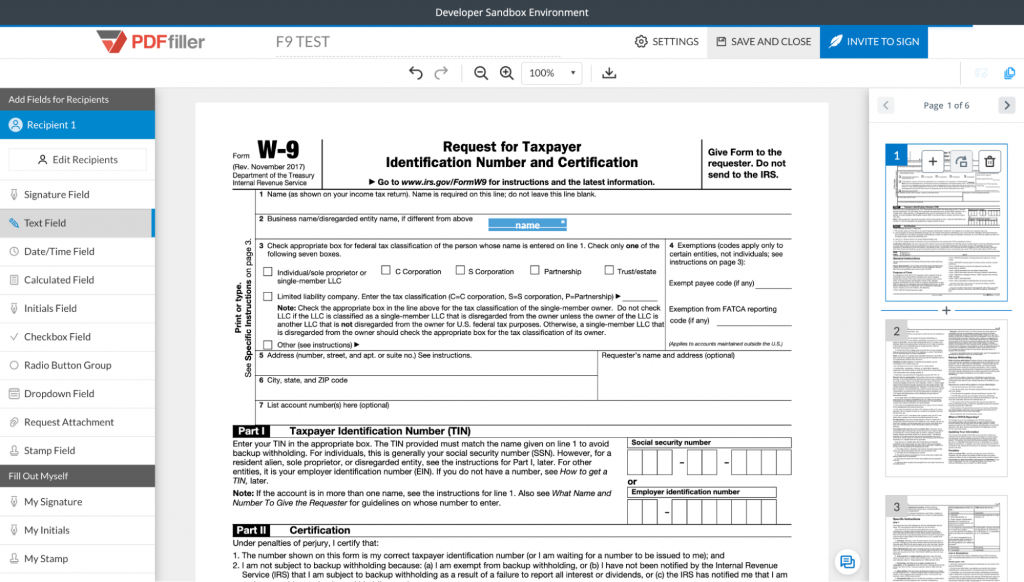
As you can see, the document containing Complex Text Tag has been successfully uploaded and the tag was converted to a fillable field.
Watch the video below to learn how to place Complex Text Tags using the signNow API:
For more information on the signNow API, including its features and references, please view our detailed documentation.

