
In addition to providing users with a convenient application to streamline complex eSignature workflows, SignNow offers a comprehensive API. Using the SignNow API, developers can seamlessly integrate electronic signature workflows with other software products.
Equipped with detailed documentation, the SignNow API ensures a smooth and hassle-free experience when implementing eSignature processes in your app, website, CRM, or cloud storage. What’s more, it’s possible to test the SignNow API for free in a Sandbox environment.
If you’re not familiar with the concept of an API or want to know more about the SignNow API in particular, this article is the best place to start.
We’ll introduce you to API basics, guide you through the essential features and principles of the SignNow API, and help you make the first steps towards integrating eSignatures in your products.
What is an eSignature API?
In the tech and software world, API stands for Application Programming Interface.
An API is code set that allows two different software products to interact with each other and exchange data under predefined conditions.
Much like humans need an interface to interact with software (graphical menus, keyboard, mouse, etc.), applications and websites need interfaces to interact with one another. The only difference is that applications use code for interaction.
But how are software solutions supposed to interact with each other? Here’s a typical example:
- An application requires specific data or functionality provided by another application, and it sends a request to the latter by calling its API (let’s say a booking website requests the information on room availability or rates from a hotel’s database).
- An API enables one application to specify what data or functionality is required and how it must be delivered. It also makes it possible for another application to understand these requirements.
- As a result, the other application responds by returning the requested information/functionality to the former app.
The same principle applies to SignNow’s eSignature API. Your application, website, or CRM may use the API to have SignNow send a document or document group for signature to one or multiple recipients, check the status of a document, download a signed file, and so on. You don’t necessarily have to use the SignNow desktop or mobile app. Instead, you can get your documents eSigned inside your own application – by means of the SignNow API.
7 reasons to use the SignNow API
Having SignNow’s eSignature workflows embedded in your application provides the convenience and seamlessness needed to streamline operations and automate eSignature processes within your app.
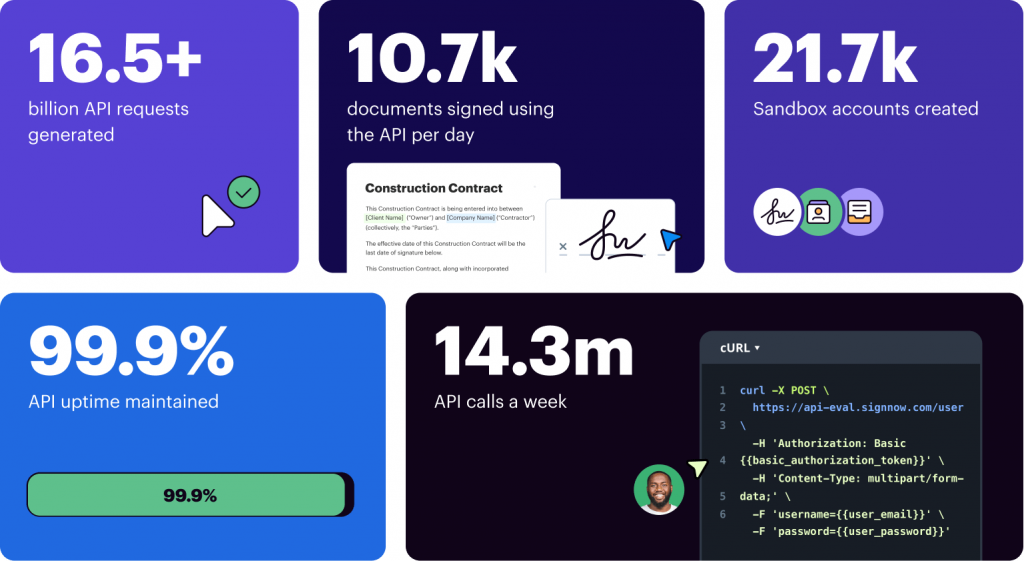
SignNow successfully manages millions of API calls generated by our customers — to date, the total number of API calls has already exceeded 16.5 billion.
With 10.7k signatures using the SignNow API per day, it’s easy to keep your business moving forward and enjoy a hassle-free way of collecting eSignatures within any integrations — whether it’s a website or CRM system.
For instance, sending eSignature invites to clients directly from your CRM is much easier than switching to another app and doing it from there. This way, you consolidate your tools, save time and hassle performing routine tasks, and eliminate a number of manual processes.
For software vendors, integrating SignNow eSignature functionality with their products helps create more value for end-users while keeping branding consistent. The SignNow REST API works seamlessly with any software solution, supports five programming languages, and scales with your needs and use cases.
The SignNow API helps independent developers and businesses build powerful eSignature integrations within various software frameworks. Trusted by 318 Fortune 500 companies since 2017, SignNow outshines the competition for the following reasons:
- Easy and fast setup. It takes no longer than ten minutes to create a Sandbox account to test SignNow API for free, and start building your integration.
- Powerful features. Configurable eSignature workflows for companies of all sizes to keep your business moving ahead.
- Security and compliance. The SignNow API uses the OAuth 2.0 protocol for authentication and complies with 21 CFR part 11, SOC 2 Type II, HIPAA, GDPR, eIDAS, and PCI DSS security standards.
- Excellent developer and end-user experience. SignNow provides API users with detailed documentation for REST and SOAP implementations, SDK libraries in five programming languages (PHP, Java, .Net, Python, Node), comprehensive video guides, and solution engineering services.
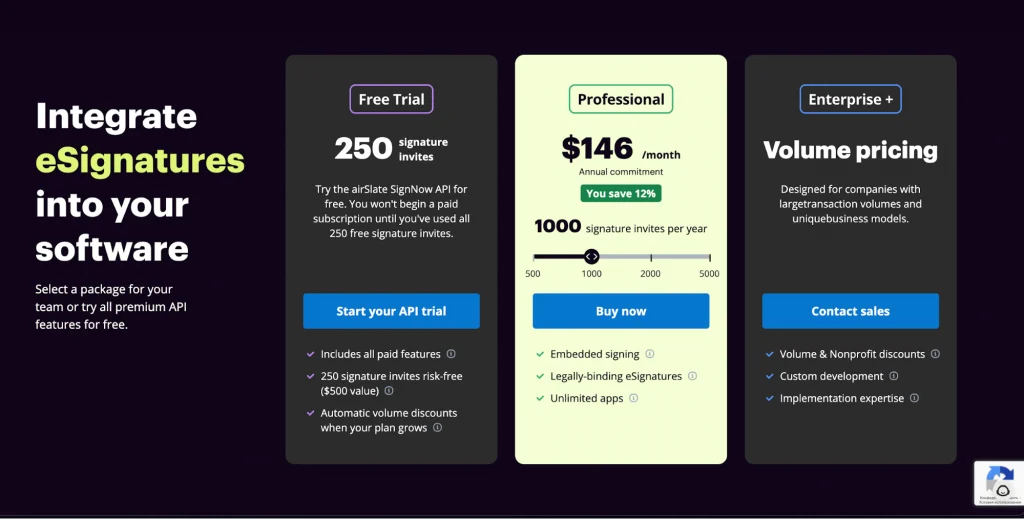
- Competitive and scalable pricing. Developers can test the SignNow API for free – each Sandbox account gets 250 free signature invites. After that, you can purchase a subscription starting at $84 per month. The subscription price scales depending on how many signature invites per year you need. Companies with large transaction volumes and unique business models are offered custom pricing plans.
Take note: All documents sent for eSignature through the Sandbox account are not legally binding. - Exceptional stability. SignNow maintains 99.9% API uptime and superior performance with 24/7 API monitoring.
- Self-service. No need to contact sales representatives to test or purchase the API.
What capabilities does the SignNow API offer?
SignNow is an award-winning eSignature solution that allows you to electronically sign documents and send them for signature to other parties. The SignNow API provides your application or website with eSignature functionality for building custom workflows that match your individual needs.
With the SignNow API, you can complete an entire document approval cycle:
Upload documents with fillable fields
- Add fillable fields (signature, text, date, initials, checkbox, radio button, or drop-down fields) to documents online to generate fillable forms.
- Create advanced forms using conditional, calculated, payment, attachment, or smart fields.
- Add fillable fields outside the SignNow application. Insert text tags containing field presets (field type, size, location, etc.) into your document using any word processor. Text tags will convert to fillable fields once you upload a document to the SignNow account.
Prepare documents for sending
- Pre-fill documents from your app or website without having to type data manually.
- Organize documents in groups (packages) to send them to one or several recipients.
- Save fillable templates and use them to create as many document copies as you need.
Send documents for eSignature
- Create role-based signature invites. Assign a signing role for each recipient and set up a signing order.
- Send FreeForm invites. Enable recipients to add their signature anywhere on a document.
- Share eSignature links. Let signers access any of your existing templates and sign their own copies.
- Send signature invites in bulk to get multiple recipients to sign documents simultaneously.
- Sign or send documents for signature inside your own website or application.
- Set signer reminders and notifications to ensure your documents are signed without delay.
- Protect your documents with a password or by using other signer authentication methods.
- Add payment fields to documents to request payments for services, along with eSignatures.
- Create branded eSignature workflows.
Check the status of documents
- Check whether a document has been signed or is still pending. Track when exactly an eSignature invite was created and to whom it was sent.
- Retrieve a document’s audit trail to review an entire log of actions and changes made to it.
- Track events and actions after you send documents for signing inside your SignNow account directly from your app using web-hooks.
Download signed documents
- Save signed documents to your computer, cloud storage, or CRM and access them anytime.
In addition to the features listed above, the SignNow API allows you to improve collaboration by creating multiple teams inside your organization. Team members can share documents and document templates to build efficient workflows. What’s more, you can use SignNow to create branded eSignature workflows adding your logo to signing invites.
Getting started: Test the SignNow API for free
SignNow provides the easiest way to collect eSignatures within your site, platform, or CRM. Customers have created more than 21.7k API accounts to test the capabilities of the SignNow API. More than that, each developer account gets 250 eSignatures complimentary.
One of the SignNow API’s indisputable benefits is its simplicity of setup. As mentioned, you don’t have to contact support or sales representatives to get hands-on experience with the API.
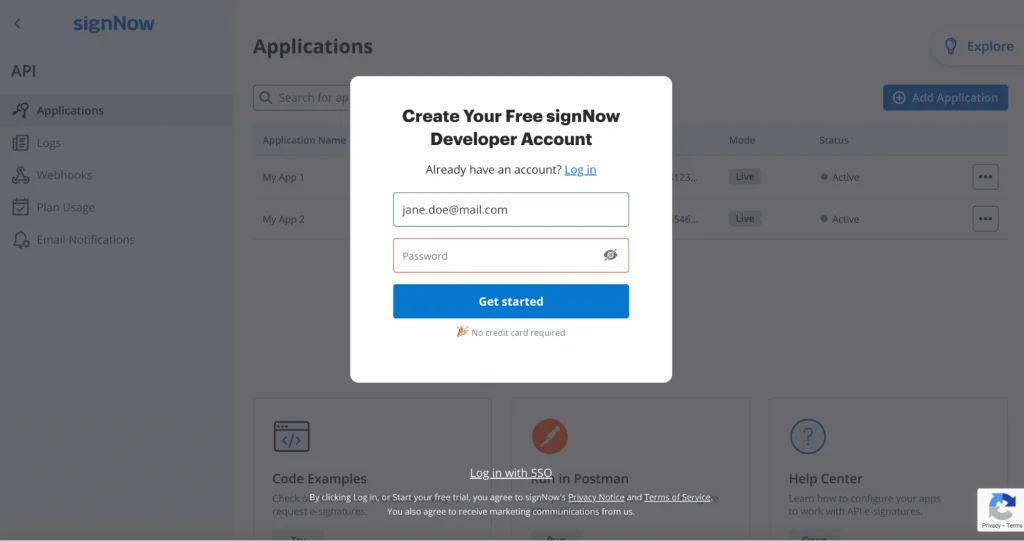
1. Create your developer SignNow account
Go to the SignNow developers page, enter your email address, and click Try API for free. Then, enter your password in the pop-up window and click Get started. To verify your account’s email address, follow the link in your email.
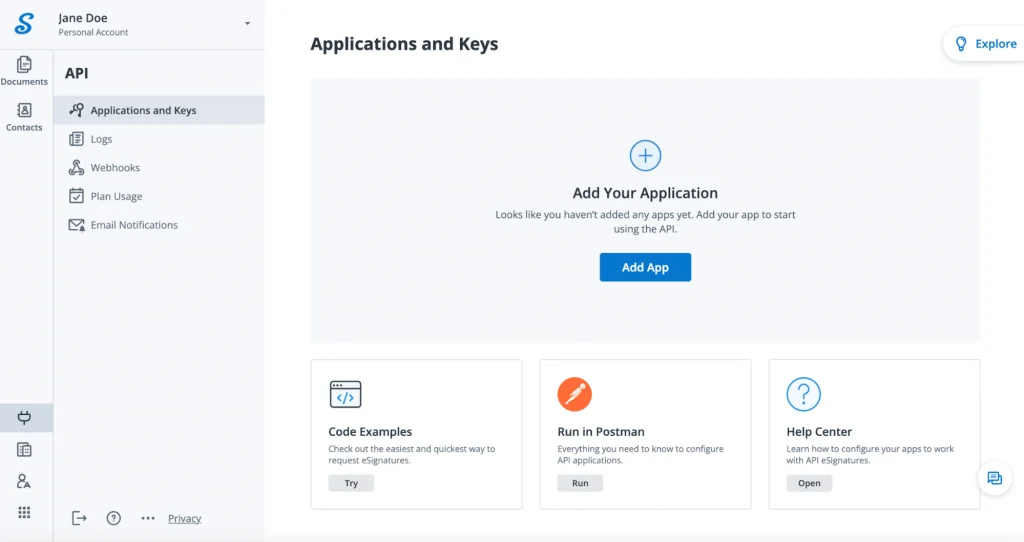
2. Create your first custom app
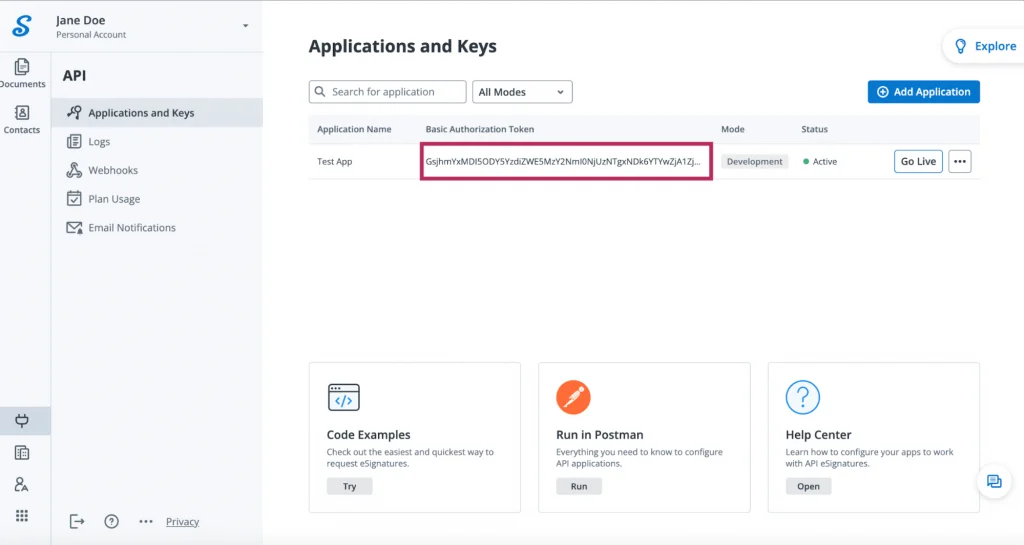
Once your account is created, you will be redirected to your API Dashboard. The dashboard is your developer portal, allowing you to manage integrations, monitor their statuses, search activity logs, and handle various API-related settings and information. To begin, simply click Add App to create your first application.
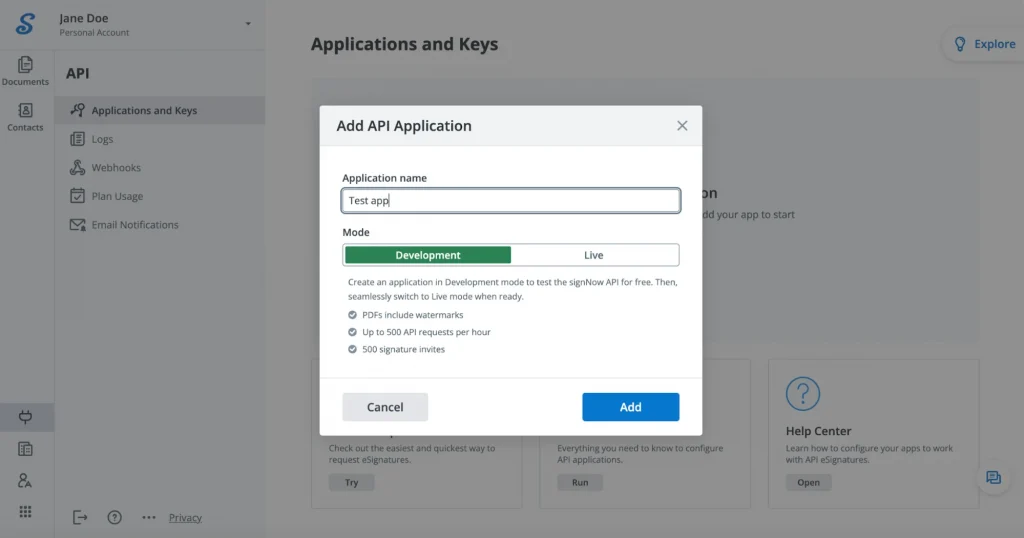
Applications allow you to authenticate and send requests on their behalf.
Enter your application name and select an application mode:
- Development: a test application that allows you to try out the API without purchasing any subscription. Seamlessly switch to Live mode when you are ready.
- Live: an application with permissions for sending actual invites.
Your dashboard is the best place to start exploring the SignNow API, as it provides your app’s credentials and code examples that you can freely test. But before testing an API call, you must create a Bearer token.
3. Get your Basic Authorization token and Access token
When you’ve created your first app, the Basic token is generated automatically. You need this token to authenticate your API request.
Next, you need to generate a Bearer or Access token that identifies you as a user in the system.
Make a call to POST /oauth2/token with your client credentials and Basic Authorization token. Use Postman or any other platform that supports API requests.
In Headers, specify the Authorization header: its value should be the word Basic followed by the Basic Authorization token. Use your account’s email and password to fill in the request’s body. You’ll receive a Bearer token and a refresh token in the response.
The base URL for all requests in both Development modes and Live modes is https://api.signnow.com.
4. Send your first invite to sign your document templates
Using the SignNow API, you can invite people to sign one document or multiple documents as a document group. The SignNow API allows you to work with different types of invites.
Your account has two documents by default, which you can use when testing the SignNow API (with one or two signer roles already configured). Select either of them. Then, copy the cUrl from the Code Examples section and run the code using your API management app.
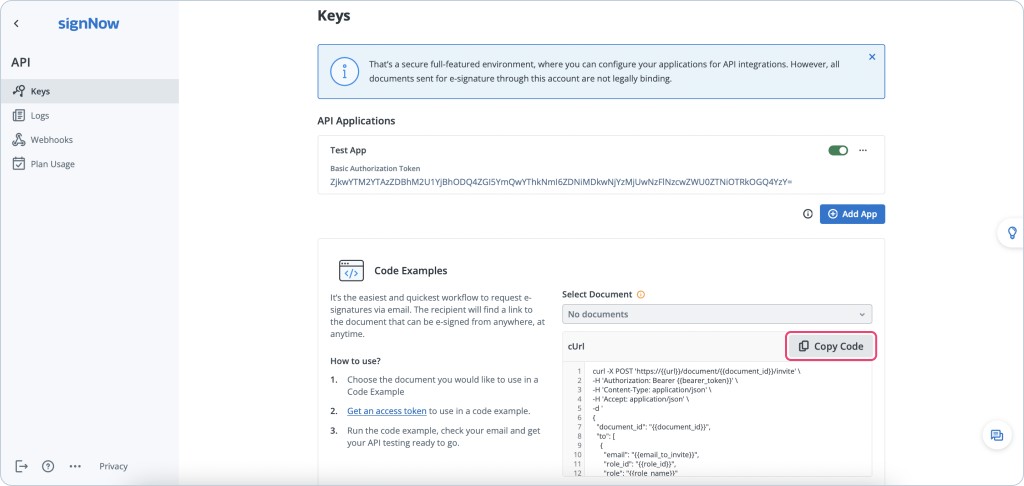
Note: Don’t forget to insert your Bearer token into the request (the access code you obtained from the previous step).
Check your email. If the code has been run correctly, your signature invite will be in your inbox immediately. Please note that documents signed in test mode are not legally binding. Please note, that a separate document or a document group signed in test mode are not legally binding.
Access this flow in Postman, and use field-based invites to sign a document in your workflow.
5. Move on to the production environment
Once you have tested the SignNow API, you can go live whenever you’re ready. Hit Go to the API Production in your API dashboard and select your subscription plan to enable legally binding eSigning for your software products.
For more information on the SignNow API, its features, and references, please view our detailed documentation.
Revolutionize your document workflow with the SignNow API and DAH
The office workflow automation platform airSlate has multiple external APIs, including SignNow API and Document Automation Hub. Document Automation Hub (DAH) offers flexible and modular APIs that revolutionize document processes, including tasks like document generation, automated document workflows, embedded PDF editing, and legal form templates. These developer-friendly APIs facilitate the creation of sophisticated, automated pipelines for the internal processing of documents.
Teaming up DAH with SignNow API takes document automation to the next level. SignNow API is renowned for efficiently integrating legally binding eSignatures and customizable workflows, fortified by enterprise-level security measures. Combined, these platforms deliver a comprehensive suite of tools that significantly enhance productivity, ensure faster deployment, and provide a seamless user experience, ultimately leading to cost savings and accelerated ROI. Together, DAH and SignNow API empower organizations to modernize their document workflows efficiently.
Build your own eSignature integration
Note that we’ve barely scratched the surface of the SignNow API in this brief guide. Hopefully, it will give you a better understanding of its capabilities and how your own product can benefit from them. You can test-drive the SignNow API for free by creating your developer account. If you have any questions or would like to discuss the API functionality or terms, you might need to contact the support team for more information.