SignNow is one of the world’s premier services for electronically signing documents. It is extraordinarily versatile, integrating with over 270 external services and supporting documents in almost any format. Ecommerce-Platforms.com and GeeksforGeeks consider it the #1 overall pick of an eSignature solution for 2024.
Many other thought leaders in the industry have also recognized SignNow as outstanding. The business software and service reviewing site G2 rates it as one of the “Leaders” among eSignature services based on SignNow’s market presence and user reviews.
Quick Sprout describes SignNow as the best electronic signature service for users who plan on sending more than a few documents a month, naming it the “Best Value Electronic Signature Software.” TechRadar Pro names SignNow the “Best eSignature Software for Businesses” in its listing of the best eSignature software for 2024.
SignNow’s API is also highly rated, with reviewers noting its ease of use, reliability, speed, and integrations with other services. SignNow offers API code snippets in a variety of languages, frameworks, download services, and clients — C, Clojure, cURL, C#, Go, HTTP, HTTPie, Kotlin, Java, Javascript, Node, Objective-C, OCaml, PHP, PowerShell, Python, R, Ruby, Swift, and Wget.
This tutorial will illustrate how to use SignNow’s API. We will demonstrate one of the API’s major features — uploading a document to be editable in the browser. The document uploaded will be a PDF, and the API calls will be made using cURL. At the end of this tutorial, you should know one way how to sign PDF using API.
Get access to SignNow’s API
To use SignNow’s API, you need to register a SignNow account, add an app as a user of the API service, and obtain a 30-day access token. Obtaining the access token requires you to enter the user email (username) and bare password for your SignNow account as part of the API call. So, we recommend you sign up for SignNow here, rather than logging in through SSO or OAuth and an external service such as Google, Facebook, or Microsoft.
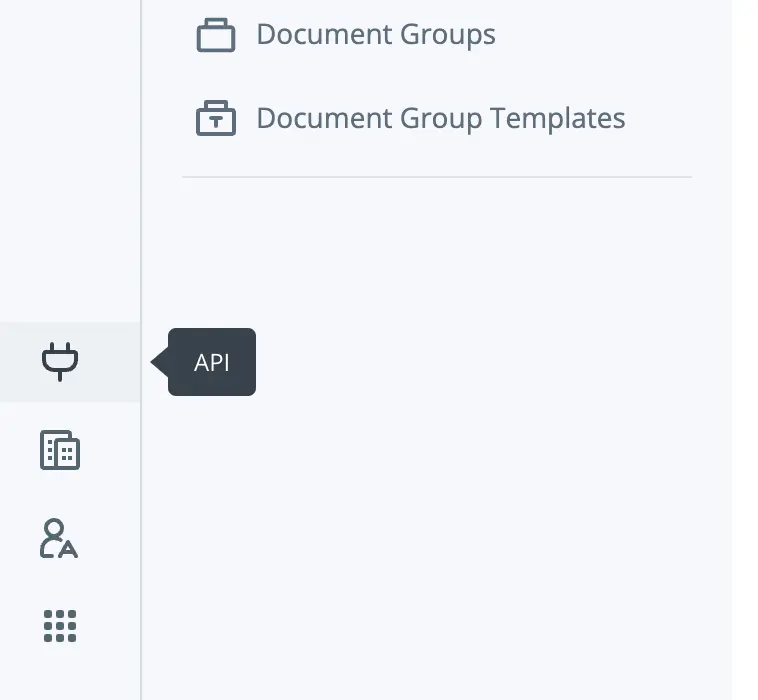
Once you have signed up for SignNow, you can log in using your user email and password here. Once logged in, you will see a home dashboard which will contain any documents you upload. Click the plug icon at the bottom left of the screen (highlighted) to go to the API plan dashboard.

Your API plan dashboard will list any applications you have registered. Click on “Add App” or “Add Application to register one. Enter your application name, select whether the mode is “Development” or “Live,” and click “Add.” Once the application is added, you will see the application listed along with its Basic Authorization Token and other information on the API plan dashboard. Click to the right of the Basic Authorization Token to copy the token. You will use it to obtain the access token for the API. Enter the following command, based on these instructions:
|
1 2 3 4 5 6 7 8 |
$ curl --request POST \ --url https://api.signnow.com/oauth2/token \ --header 'Accept: application/json, ' \ --header 'Authorization: Basic {{basic_authorization_token}}' \ --header 'Content-Type: multipart/form-data' \ --form username={{SignNow_account_email}} \ --form 'password={{SignNow_account_password}}' \ --form grant_type=password |
where {{basic_authorization_token}}, {{SignNow_account_email}}, and {{SignNow_account_password}} are replaced with your Basic Authorization Token, SignNow account email, and SignNow account password respectively.
If all goes well, the API call will return a 30-day access token. Save the access token, which unlocks your ability to make other types of calls to the SignNow API.

Upload the document
There are multiple ways to upload the document using the SignNow API. Documents can be uploaded from a file, with or without SignNow text tags. Or, in this tutorial, we will upload the document from a URL.
The PDF document we will upload is a U.S. IRS (Internal Revenue Service) form W-8 BEN, normally filled out by a foreign seller or employee being paid for a good or service. Its purpose is to confirm the person or organization filling it out is not a U.S. taxpayer, for U.S. tax accounting purposes. This form includes pre-added text fields for filling out relevant information. Upload the document to SignNow based on these instructions:
|
1 2 3 4 5 6 7 8 9 |
curl --request POST \ --url https://api.signnow.com/v2/documents/url \ --header 'Accept: application/json' \ --header 'Authorization: Bearer {{access_token}}' \ --header 'Content-Type: application/json' \ --data '{ "url": "https://www.irs.gov/pub/irs-pdf/fw8ben.pdf", "check_fields": true }' |
where {{access_token}} is your access token. If all goes well, this API call will return the document ID. Save this document ID.
Generate a link and edit the document in the browser
Finally, you will generate a link to edit and sign the document in the browser, based on these instructions:
|
1 2 3 4 5 6 7 8 9 10 |
curl --request POST \ --url https://api.signnow.com/v2/documents/{{document_ID}}/embedded-editor \ --header 'Accept: application/json' \ --header 'Authorization: Bearer {{access_token}}' \ --header 'Content-Type: application/json' \ --data '{ "redirect_uri": "http://www.signnow.com", "link_expiration": 15, "redirect_target": "blank" }' |
where {{document_ID}} is the document ID you obtained when uploading the document and {{access_token}} is your access token. Links generated using this API endpoint can also be embedded into apps, for app users to edit the documents without sending them for signature.
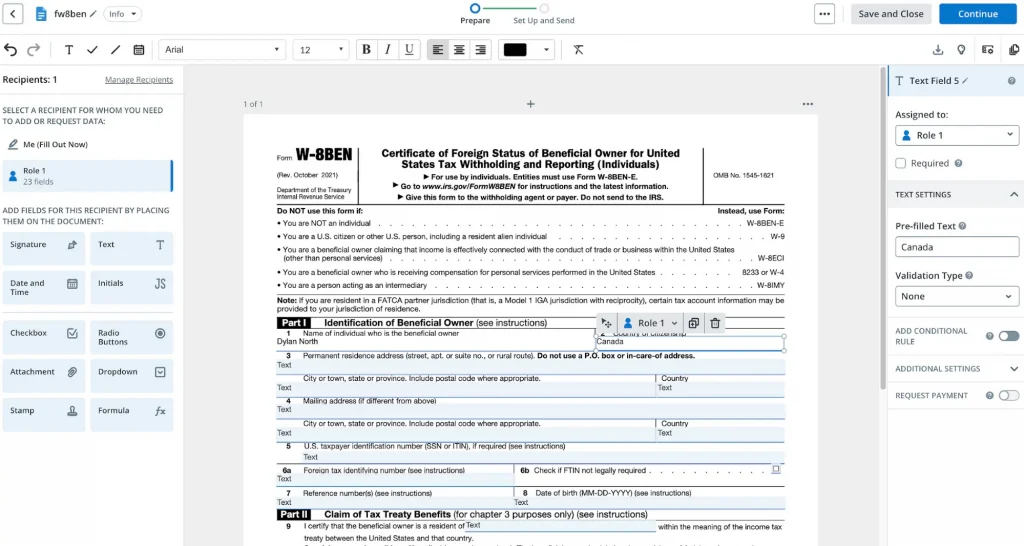
If all goes well, you will obtain a URL for editing the document in the browser. Remove the backslashes from the URL and you can copy and paste it into the browser. It will point to the form, editable as shown.

At the top of your browser screen, it says “Prepare.” This means you are preparing the document to be filled out and signed by others. The document’s text fields can be pre-filled. In the image above, we have filled out the name and country of the signer.
At the bottom of the document, a Signature field is already part of the W-8 BEN form. This field cannot be pre-filled during the preparation of the document but must be left for the signer. The buttons to the left of the document can be used to add more fields.
Settings of a field
The panel on the right appears when a field is clicked on, and can be used to change the settings of a particular field. Available settings may vary for different types of fields.
You can specify whether or not the field is required. For text fields, recipients can be added in the “Assigned to” dropdown. “Validation Type” allows you to require that the field be filled out in a certain format. You can also add a “Conditional Rule” using this panel, stipulating that the field is only shown when certain conditions, such as specific other fields being filled out, are met.
“Additional Settings” on the right-side panel for text fields include a character limit, a line limit, fitting characters into individual boxes, a field label (fields with the same label are automatically pre-filled with the same data), and the positional coordinates of the field.
Request a payment
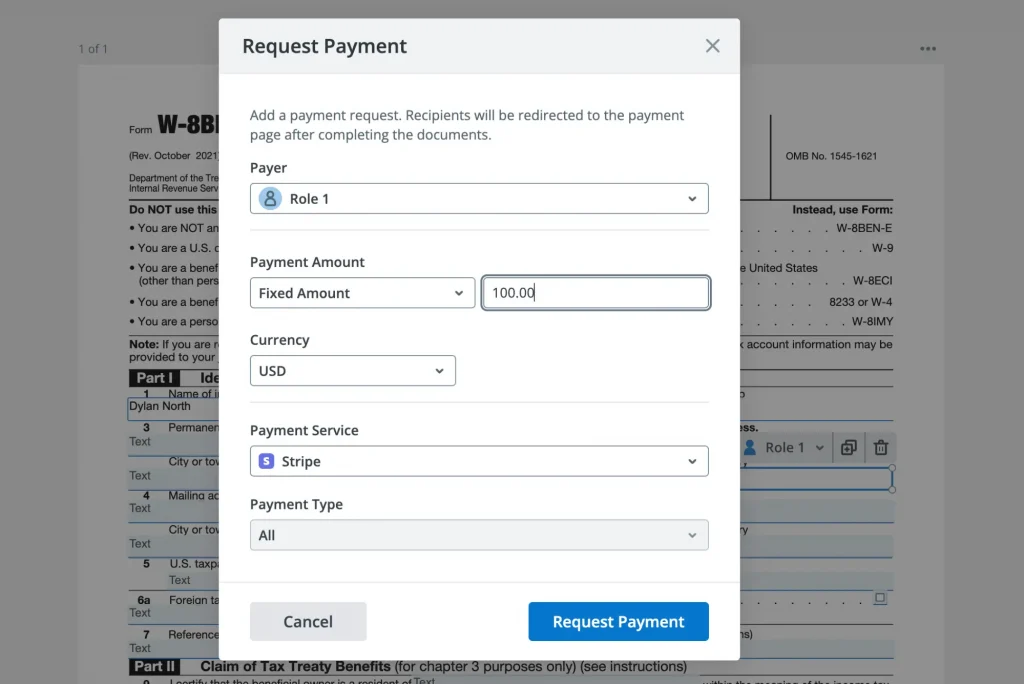
You can even use the right-side panel to add a Stripe, CardConnect, or Payeezy credit card payment request to a field, although this requires several more steps. You need to make the field required and set up payment services.
To set up payment services, create an organization and save its ID. Add a user to this organization, corresponding to the email address associated with your SignNow account. Credit card payments will only work if a user at the email address associated with your SignNow account has been added as an active member of the organization. Activate your membership by checking your email, or get your user ID and activate your membership through the API.
On the “Payment Services” page of your SignNow account dashboard, connect the payment service you wish to use to SignNow. Finally, create a merchant account within your organization, with its publishable and secret keys obtained from the payment service’s API.

Request Payment is shown for completeness purposes, and for illustrating the wide range of features supported by SignNow and its API. In this tutorial, we will only use basic fields and settings, rather than including as advanced a feature as payments.
Send the document to the signer
Pre-fill “1. Name of individual who is the beneficial owner” (here, “Dylan North”) and “2. Country of citizenship” (here, “Canada”). Then click “Continue” to send the document to the signer. You may want to “Customize Invite.” Some of the features “Customize Invite” enables are sending a customized message, inviting recipients to fill out and sign the document via SMS text rather than email, and adding CC recipients.
Upon receiving the document, Dylan North will see his name and country filled out. He can modify his name and country and fill out the rest of the form, including adding his signature. The SignNow account owner will receive the filled-out and signed document.
Fill out and sign PDF via API
Here, we have used SignNow’s sign PDF API to upload a document and generate an app-embeddable link to edit and pre-fill its fields in the browser. This might be the best illustration and visualization of SignNow’s features. However, this is only one of the ways SignNow can be used to edit, fill out, send, and sign documents.
Creating, editing, and pre-filling a document’s fields can also be done directly through API calls, as can sending a document to a recipient by email or SMS text for signing. The API offers numerous other features that are described in the documentation, and that we recommend you check out if you are interested in its possibilities.
Watch the video below for more information and insights on this topic:
Thank you for taking the time to learn about the SignNow API. Join the over 30 million people benefitting from this convenient, legally compliant eSignature solution. And enjoy this orange tabby kitten.


