signNow Text Tags are specific combinations of symbols and letters in a document that represent fillable fields. Users can generate and dynamically embed signNow API Text Tags in their documents to specify the positioning of signature fields, text fields, date fields, and others. When a document containing Text Tags is sent out for signing, the tags are automatically replaced with fields. signNow supports three kinds of Text Tags: Simple Text Tags, Complex Text Tags, and Invite Text Tags.
If you’re new to the signNow API, make sure to check out our ultimate guide to the signNow API to get a better understanding of how it works. You can also learn more about real-life signNow API use cases provided by our customers across different industries – digital lending, medical insurance, remote online notarization, athletics, and more.
In this blog, we’ll explain how to use signNow Text Tags to dynamically specify where fields should appear in your documents and how to send out these documents for signing using the signNow API.
Simple Text Tags
Simple Text Tags, also known as Anchor Tags, can be placed within the content of any PDF, DOC, or DOCX document in order to specify the location, size, and type of any fillable field within your document. There’s no need to specify any field properties in an API request.
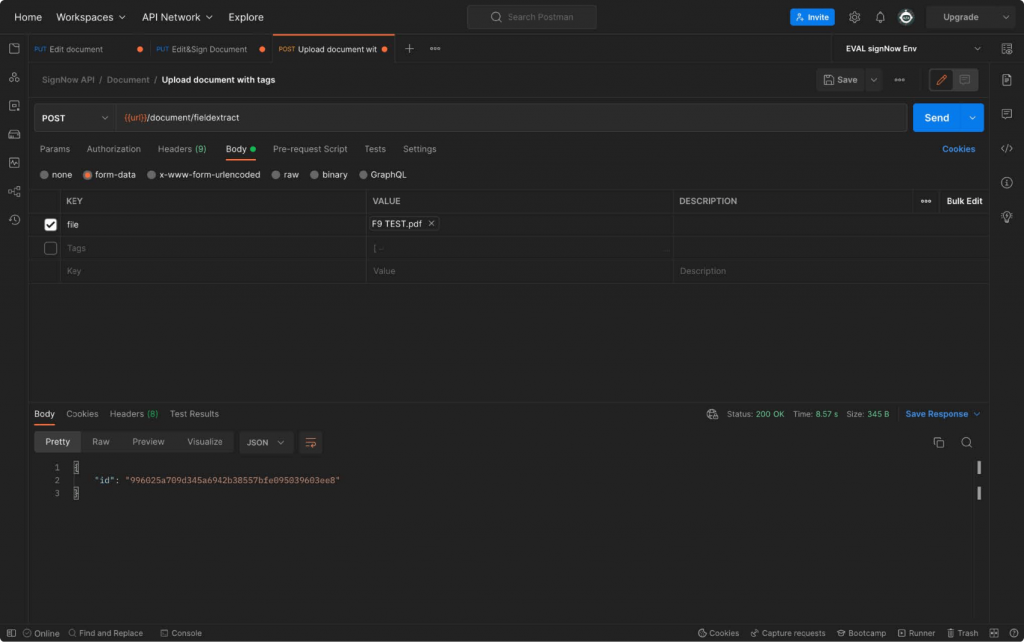
Upload a document using POST /document/fieldextract and add only the name of the document in the request:
|
1 2 3 4 |
curl -X POST \ https://api-eval.signnow.com/document/fieldextract \ -H 'Authorization: Bearer {{access_token}}' \ -F 'file=@/path/to/FILE_NAME.pdf' |
When you add a Simple Text Tag to a document, you should combine the keys in curly brackets in a specific order. Every key stands for the property of a field.
Simple Text Tag formula will appear as follows
|
1 |
{{t:[s/i/t/d/c];r:[y/n];o:"Role";l:"date";w:width;l:length;v:"validator_id";}} |
Simple Text Tag formula with prefilled text
|
1 |
{{t:t;r:n;o:""CEO"";l:""Label"";p:""test prefilled text"";h:75;}} |
Note: The signNow documentation includes examples of order of field properties in a Text Tag and examples of the Simple Text Tag for your reference.
Simple Text Tags also work for Radio Buttons. To add a Radio Button, follow this example:
|
1 |
{{t:r;r:y;o:"Employee";rn:"Group_name";rv:"value-1";checked:0;}} |
rn – “radio name”, the name of your radio button. Several radio buttons related to one question/section make up a radio button group. If you’d like to add a radio button group, add several text tags with the same radio name.
rv – radio value identifies the value to be checked/unchecked by this radio button.
checked – determines whether the button is checked by default. Possible values: 0 – unchecked; 1 – checked.
How to place Simple Text Tags
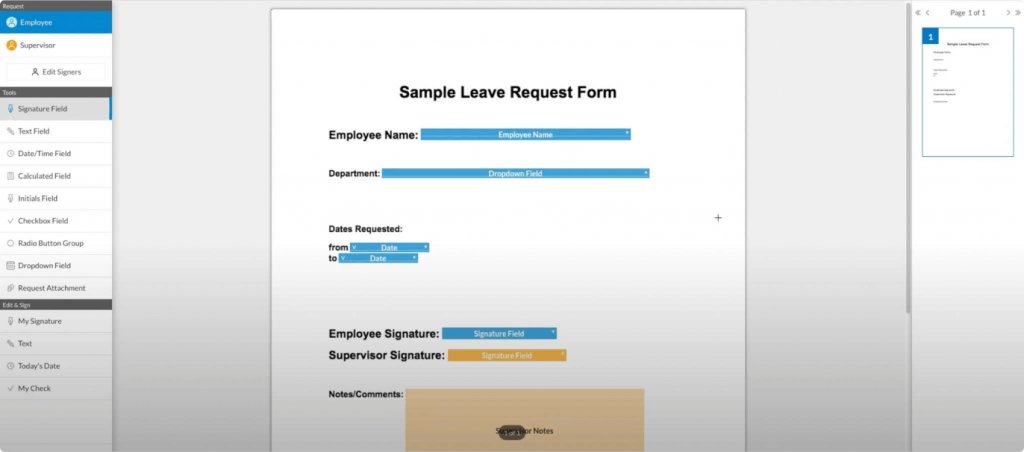
Now let’s take a look at how Simple Text Tags are used in a document. Start by creating a sample employee leave request document and adding fields to it. Also, since it’s a leave request, we want to assign these fields to two signers: an Employee and a Supervisor.
Some of the most commonly used types of fillable fields in signNow are signature, initial, text, dropdown, and checkbox, and each type has its own identifier. We’re not going to cover fillable fields in this blog, but for more information, please see How to add signature fields and set signing roles using the signNow API.
Let’s start with the Employee Name field. It’s a text field, so the t value here stands for text. Then we need to specify that this field is required by adding the y value. Finally, we’re going to assign the field to the employee and specify the label.
Next comes the Department field. Let’s make it a dropdown menu by setting the field type value to d, then, again, making it required, assigning it to the employee, and adding three values: HR, Sales, and Marketing.
The Requested Dates field is the next text field. This time we’re going to add the validator ID to make sure the field only accepts inputs for the date. To view the list of available validators, follow the link in the description, or simply send the GET validator request.
Next, we want our document to be signed. So we’re going to add two signature fields and assign them to the employee and the supervisor.
After the signature fields have been filled out, the supervisor may want to leave their feedback in the Notes field. Let’s make this field optional and set its width and height to make sure it is large enough to fit a block of text. Another way to increase or reduce field dimensions is by changing the font size. The smaller font size you set, the smaller your field will be, and vice-versa.
Sample Leave Request Form
Employee Name: {{t:t;r:y;o:”Employee”;l:”Employee Name”;}}
Department: {{t:d;r:y;o:”Employee”;l:”Dropdown Field”;dd:”HR, Sales, Marketing”;}}
Dates Requested:
from {{t:t;r:y;o:”Employee”;v:"059b068ef8ee5cc27e09ba79af58f9e805b7c2b3";}}
to {{t:t;r:y;o:”Employee”;v:"059b068ef8ee5cc27e09ba79af58f9e805b7c2b3";}}
Employee Signature: {{t:s;r:y;o:"Employee";}}
Supervisor Signature: {{t:s;r:y;o:"Supervisor";}}
Notes: {{t:t;r:n;o:”Supervisor”;l:”Supervisor Notes”;w:300;h:100;}}
Now let’s send an example request to check if everything is working how we want it. To upload a document to signNow, use the following endpoint.
|
1 |
https://api-eval.signnow.com//document/fieldextract |
For more information on how to upload a document, see How to upload, edit, and delete a document using the signNow API.
Head back to your signNow account and reload the page. Your document containing Simple Text Tags has been successfully uploaded. Open it and make sure all the tags you added have been converted to fillable fields.
Watch the step-by-step instructions in the video below:
For more information on the signNow API, including its features and references, please view our detailed documentation.